How to Use BoltRoute
Everything you need to verify emails, manage credits, and integrate with your workflow. Get started in minutes.
Getting Started
Create account, first verification
Verify Emails
Manual & bulk verification
Understanding Results
Valid, Invalid, Catch-all explained
Integrations
Zapier, Make, n8n, Google Sheets
API Keys
Generate and manage keys
Credits & Billing
Pricing, credits, purchases
Getting Started
Creating Your Account
Go to the signup page
Visit app.boltroute.ai/signup and enter your email address and create a password.
Verify your email
Check your inbox for a confirmation link. Click it to activate your account.
Log in and start verifying
Access your dashboard at app.boltroute.ai. New accounts receive free credits—no credit card required.
Getting Started Tutorial Video
Recommended: 1-2 minute walkthrough of signup and first verification
Dashboard Overview
After logging in, you’ll see your main dashboard with key metrics at a glance:
Credits Remaining
Your current credit balance, displayed in the sidebar and overview. Credits never expire and accumulate across all purchases.
Total Verifications
Lifetime count of all emails you’ve verified through BoltRoute.
Quality Mix
Visual breakdown of your verification results: Valid (green), Invalid (red), and Catch-all (orange).
Credit Usage Trend
Graph showing your verification activity over time. Monitor usage patterns and plan credit purchases.
Verification History
Recent verification tasks with status, dates, and quick access to download results.
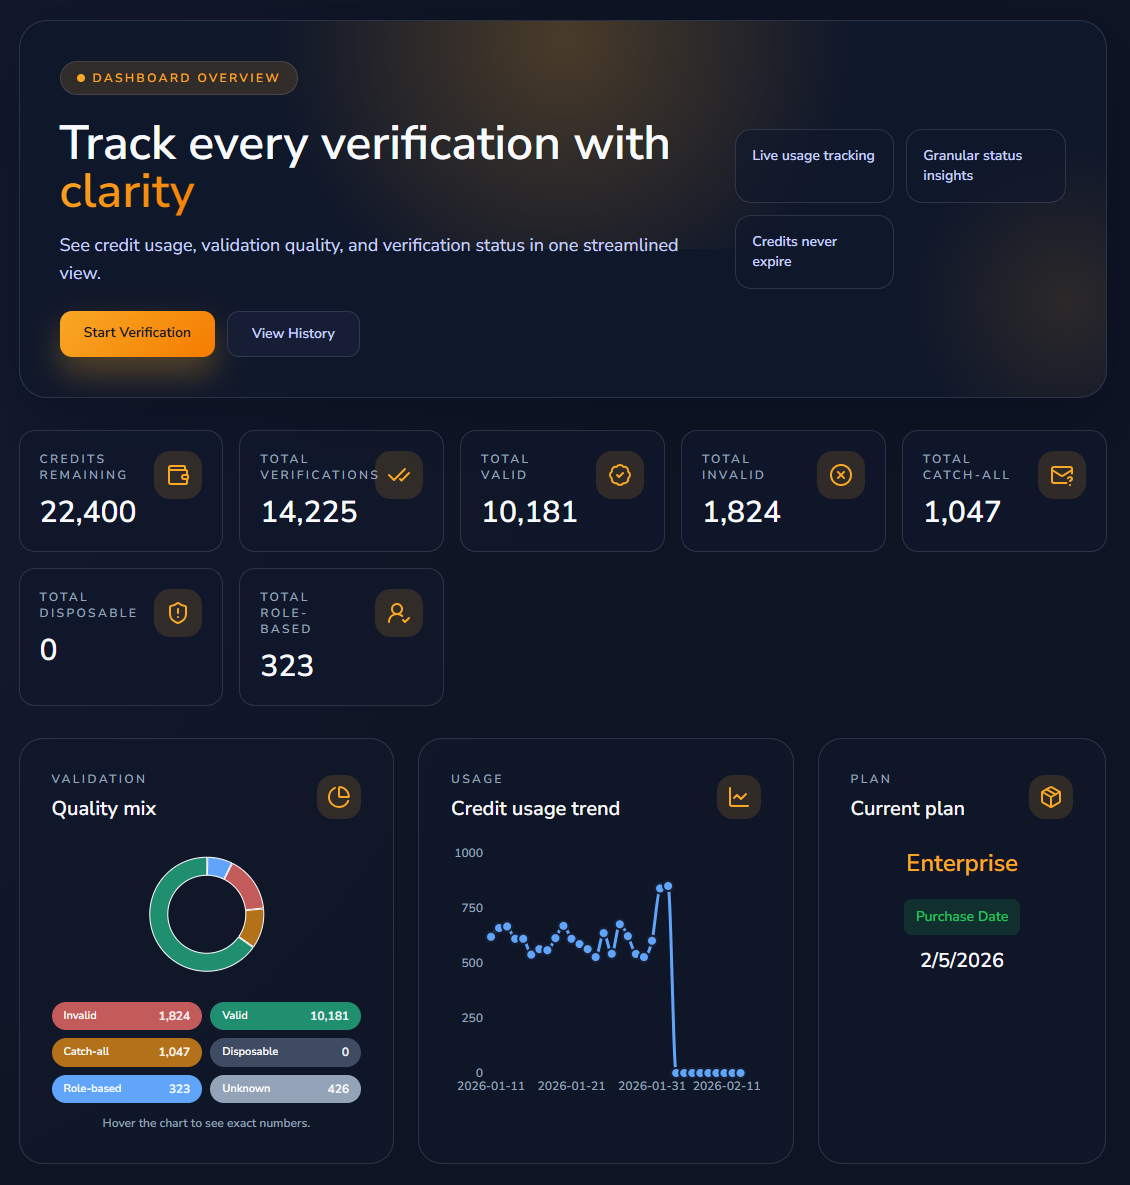
Dashboard Overview page
Verifying Emails
BoltRoute offers two verification methods: manual for quick checks and bulk upload for lists.
Manual Verification
Best for quick checks of 1-25 emails.
Go to Verify in the sidebar
Paste emails into the text area — one email per line (maximum 25 emails)
Click Verify emails
Results appear in the “Live results” panel on the right
Important: Manual verification results are only available during your current session. Download them immediately after verification completes—they disappear when you log out or refresh the page.

Verify page - manual verification section
Bulk Upload
Best for verifying lists of 26+ emails.
Go to Verify in the sidebar and scroll to the Bulk upload section
Drag and drop your file or click Browse files
Select which column contains email addresses (column mapping)
Click to start verification. You’ll receive an email notification when complete.
File Requirements
| Supported formats | TXT, CSV, XLSX |
| File size limit | Defined by server configuration |
| Rows | Up to 10,000 emails per file |
Pre-upload checklist:
• Ensure each row has one email address
• Label your email column clearly (makes mapping faster)
• Remove duplicate rows if you don’t want to verify the same email twice
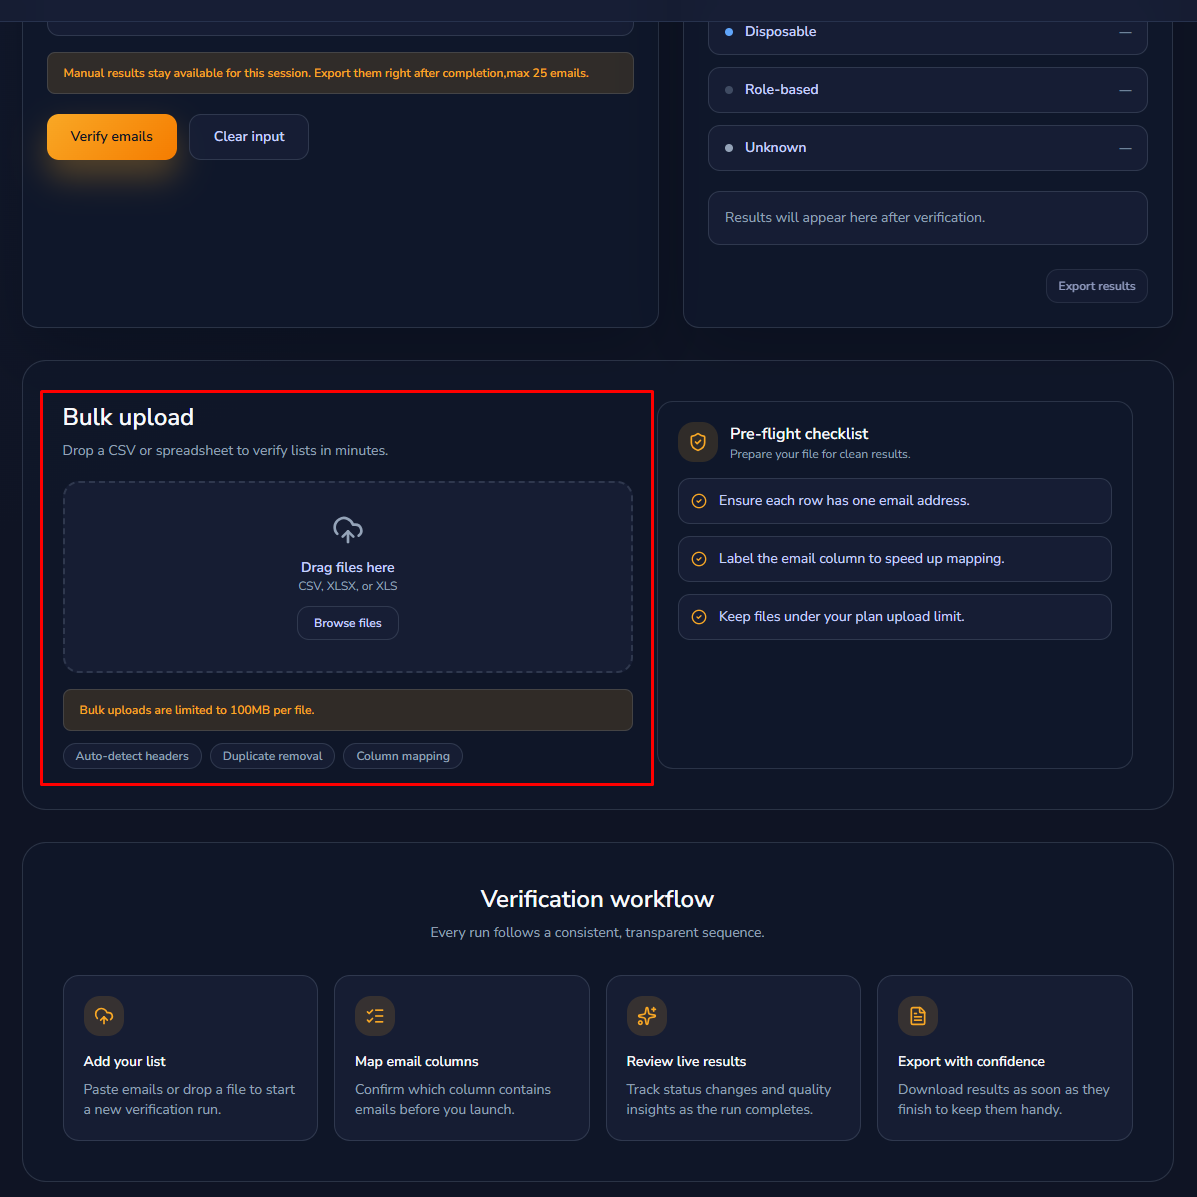
Bulk upload section
Column Mapping
If your file has multiple columns, you’ll see a mapping screen. Select the column containing email addresses and confirm to start verification.
BoltRoute auto-detects common header names like “email”, “Email”, “EMAIL”, “email_address”, etc.
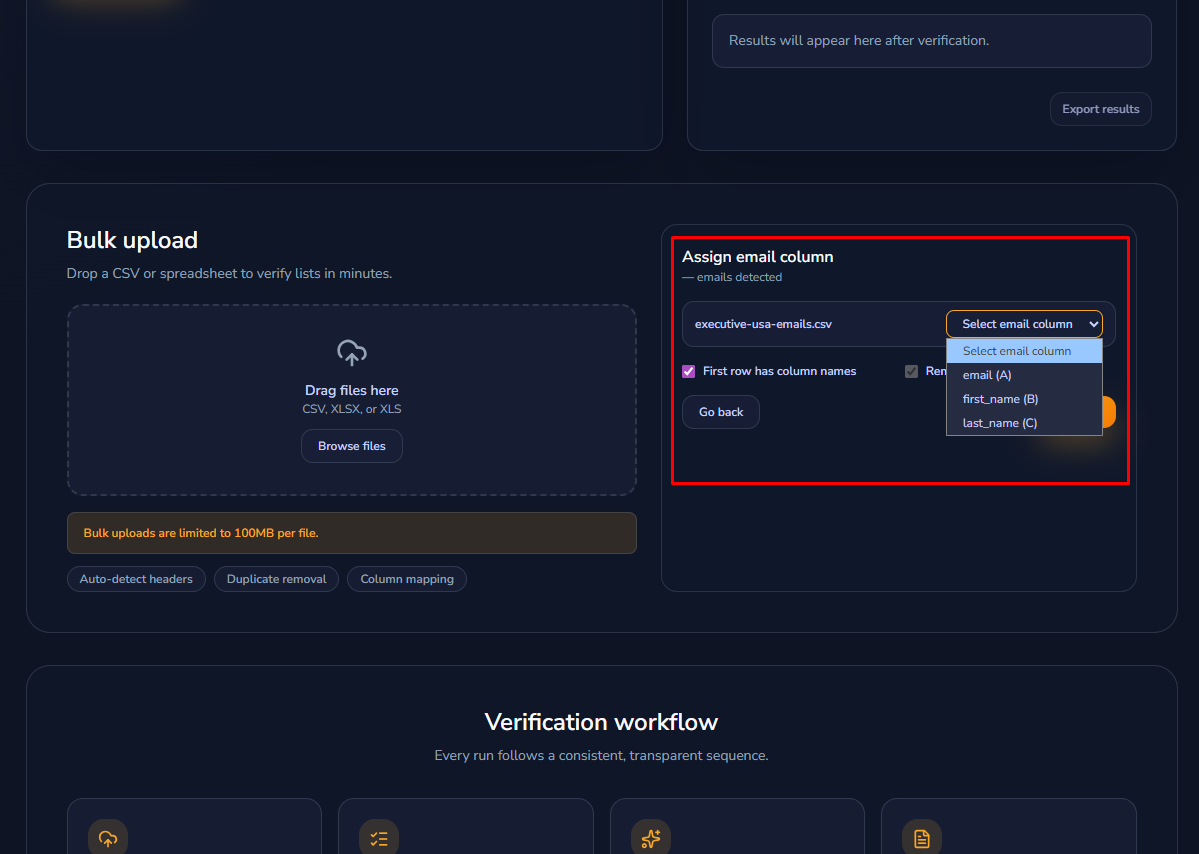
Column mapping screen
Understanding Results
Verification Statuses
| Status | Meaning | Charged? |
|---|---|---|
| ● Valid | Email exists and can receive mail | Yes |
| ● Invalid | Email doesn’t exist or is inactive | Yes |
| ● Invalid Syntax | Email format is invalid (API status: invalid_syntax) | Yes |
| ● Disposable Domain | Disposable/temporary email domain detected (API status: disposable_domain) | Yes |
| ● Catch-all | Domain accepts all emails regardless of inbox existence | Yes |
| ● Unknown | Couldn’t verify due to server restrictions | No |
What is Catch-all?
Some domains (often corporate) are configured to accept emails to any address, even if the mailbox doesn’t exist. These are called “catch-all” domains.
Example
If example.com is catch-all, both john@example.com and nonexistent12345@example.com will be accepted by their server—we can’t determine if the specific inbox exists.
What to do with catch-all results: Most users either send to them (accepting some bounce risk) or exclude them from cold outreach campaigns. The choice depends on your risk tolerance and use case.
Additional Flags
BoltRoute also detects and flags these in your export results:
| Flag | Description |
|---|---|
| Disposable | Temporary/throwaway addresses (Mailinator, Guerrilla Mail, 10MinuteMail, etc.) |
| Role-based | Generic addresses like info@, support@, sales@, admin@ |
History & Downloads
Viewing Past Verifications
Go to History in the sidebar to see all verification tasks.
Each entry shows:
• Date — When the verification was submitted
• Task name — Filename for bulk uploads
• Valid/Invalid/Catch-all counts — Result breakdown
• Status — Completed, Processing, or Failed

History page
Task Status Meanings
| Status | Meaning |
|---|---|
| Completed | Verification finished, results ready to download |
| Processing | Verification in progress (time depends on list size) |
| Failed | Something went wrong — contact support |
Processing time depends on list size. You’ll receive an email notification when bulk verification completes.
Downloading Results
Find your completed task in History
Click the download button
Results download as CSV, TXT, or XLSX files
Export includes
Original email, verification status, catch-all flag, disposable flag, role-based flag
Results never expire. Download anytime from your History page.
Integrations
BoltRoute connects directly with automation platforms so you can verify emails inside your existing workflows.
Native Integrations
Zapier
Trigger verification when leads arrive, forms submit, or lists update
Make
Build visual verification workflows with conditional logic
n8n
Native node for cloud or self-hosted workflows
Google Sheets
Verify directly in your spreadsheet—no exports needed

Integrations page
Setting Up Zapier
Create a new Zap — Choose your trigger app (HubSpot, Typeform, Google Sheets, etc.)
Add BoltRoute as the action — Select “Verify Email” and connect your BoltRoute account using your API key
Map the email field from your trigger to BoltRoute
Add another action to handle results — update the original record, add to a sheet, or route based on status
Test and enable your Zap
⏱️ Setup time: 5-10 minutes
Setting Up Google Sheets
Install the add-on — Go to Extensions → Add-ons → Get add-ons → Search “BoltRoute”
Connect your account — Enter your API key when prompted (one-time setup)
Select your email column in the BoltRoute sidebar
Click “Verify” — Results appear in new columns: status, catch-all, disposable, role-based
⏱️ Setup time: 2-3 minutes
Workflow Examples
• New HubSpot contact → Verify email → Update contact record with status
• Typeform submission → Verify email → Add valid leads to Mailchimp
• Google Sheet row → Verify email → Route invalid to separate tab
BoltRoute works with 70+ tools through Zapier, Make, and n8n. If your tool connects to any of these platforms, you can integrate email verification.
📚 For detailed setup guides: boltroute.ai/integration-details
API Keys
API keys let you connect BoltRoute to external tools and custom applications.
Generating an API Key
Go to API in the sidebar
Click Generate API key
Name your key (e.g., “Zapier”, “n8n”, “Google Sheets”)
Copy the key immediately — in the dashboard it won’t be shown again
Note: API users can retrieve plaintext keys with GET /api/v1/api-keys?reveal=true when key reveal is enabled.
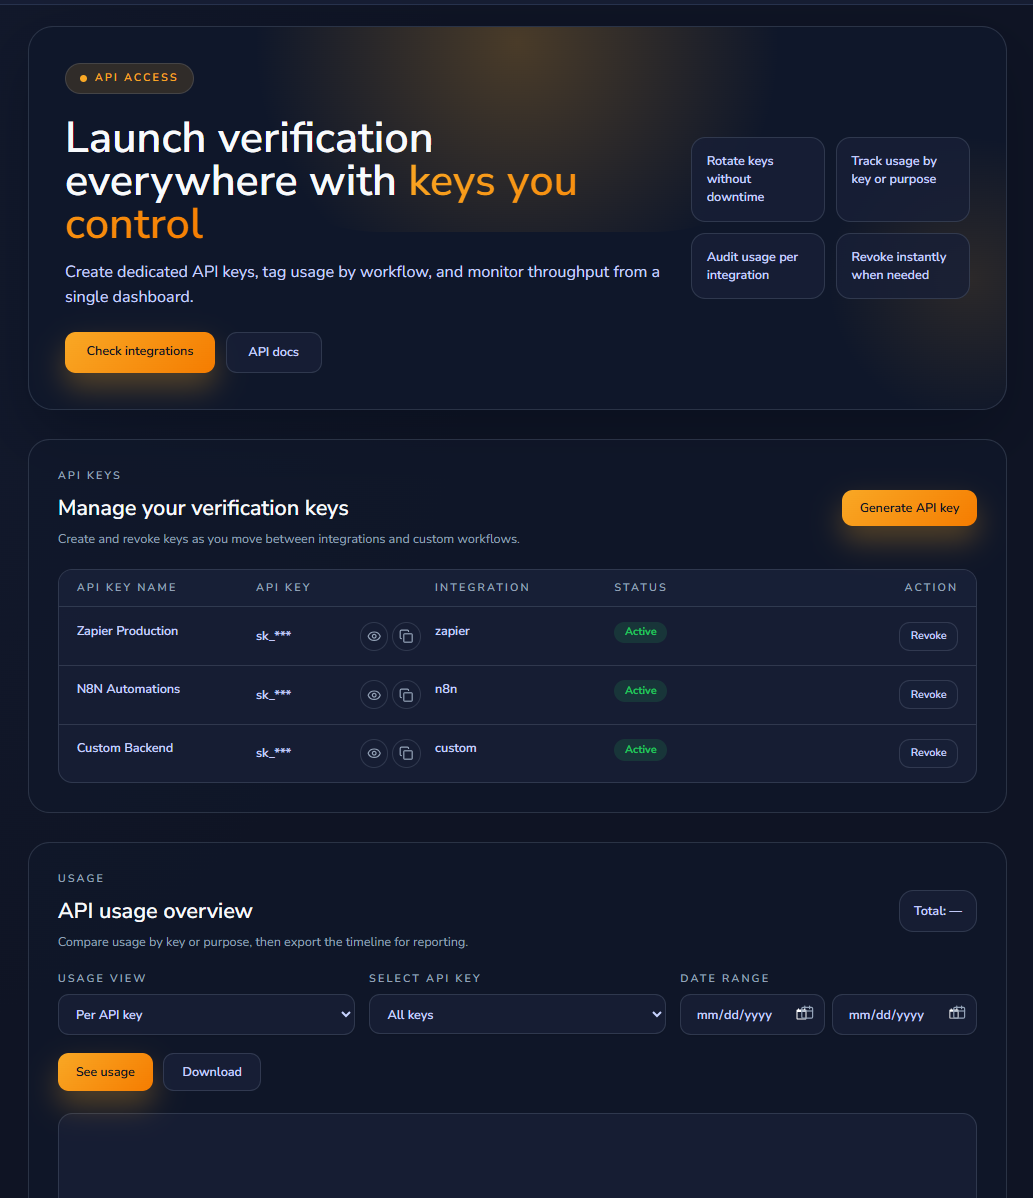
API page
Managing Keys
Each key shows:
• Name — Your label for the key
• Integration type — For usage tracking
• Status — Active or Revoked
• Actions — Revoke button
Best practice: Create separate keys for each integration. This lets you track usage per platform and revoke access without affecting other integrations.
Revoking a Key
Find the key in your API page, click Revoke, and confirm. Revoked keys stop working immediately—any integration using that key will fail until you provide a new key.
API Rate Limits
Rate limits return HTTP 429
When you exceed limits, the API returns 429 and includes a Retry-After header. For higher throughput, contact us.
📚 For API documentation and code examples: docs.boltroute.ai
Credits & Billing
How Credits Work
1 credit = 1 email verification
| Charged results | Valid, Invalid, Catch-all |
| Free results | Unknown (you’re never charged for emails we couldn’t verify) |
| Expiration | Credits never expire |
| Pooling | All credits accumulate across purchases |
Checking Your Balance
Your credit balance appears in two places:
• Left sidebar (always visible)
• Overview dashboard
Buying Credits
Go to Pricing in the sidebar
Choose purchase type: One-Time, Monthly (30% off), or Annual (50% off)
Use the slider to select credit amount (minimum 2,000)
Click Buy Credits and complete payment via credit card or PayPal

Pricing page
Volume Pricing
The more you verify, the more you save
10K
$37
$0.0037/ea
25K
$56
$0.00224/ea
50K
$84
$0.00168/ea
100K
$141
$0.00141/ea
500K
$284
$0.000568/ea
1M
$426
$0.000426/ea
5M
$1,519
$0.000304/ea
10M
$2,469
$0.000247/ea
Monthly (30% off) and Annual (50% off) plans apply additional discounts.
Need more than 10M credits? Contact sales.
Purchase History
Go to Account to view all past purchases with dates, amounts, and invoice numbers.

Account page - purchase history
Account Settings
Updating Your Profile
Go to Account in the sidebar to:
• Change display name
• Update email address
• Change password
Click Update profile to save changes.
Account page - profile section
Changing Your Password
Go to Account
Enter current password
Enter new password
Click Update profile
Deleting Your Account
Contact support to request account deletion. We’ll remove your account and all associated data in compliance with GDPR.
Troubleshooting
“Processing” Status Stuck
Bulk verification time depends on list size and domain response times. Large lists (100K+) can take several hours.
If a task shows “Processing” for more than 24 hours, contact support.
Results Show Mostly “Unknown”
This usually means the email servers are blocking verification attempts. Common causes:
• Target domain has aggressive rate limiting
• Target domain blocks SMTP verification entirely
• Network connectivity issues
Unknown results are not charged.
File Upload Fails
Check that your file:
• Is TXT, CSV, or XLSX format
• Has no more than 10,000 emails
• Has at least one column with email addresses
• Isn’t corrupted (try opening it locally first)
API Key Not Working
Verify that:
• The key is copied correctly (no extra spaces)
• The key status is “Active” (not revoked)
• You’re using the correct API endpoint: https://api.boltroute.ai/api/v1/verify
Wrong Credit Deduction
Credits are only deducted for Valid, Invalid, and Catch-all results. If you believe there’s an error, contact support with your task ID.
Still Need Help?
Our support team responds within 4 hours during business hours.